Connecting Dungeon Rooms Seamlessly Through Doors
How I simplified dungeon generation by focusing on organic door connections, leaving complicated grids behind.
Dungeon generation in games often relies on placing rooms randomly on rigid grids. This traditional approach works but can limit creativity and complexity. You typically end up having to use complex algorithms like Dijkstra's just to connect everything logically. But what if you wanted more freedom, diversity, and organic layouts?
I faced this exact problem and decided to experiment with something different. Instead of starting with grids, I thought, "Why not connect rooms organically through their doors?" Using generic room templates (prefabs) with predefined doors, each new room connects naturally to the previous one by selecting matching doors. It turned out to be simpler and more flexible than expected.
Take this image as an example. I wanted the whole process to be generic, but simple. Each color serves a different purpose, but once you get going it becomes quick to understand. This allowed me to make different room structures, really fast.
- Green - Chance to become a door, or a wall.
- Purple - Always a wall
- Blue - Chance to become a window, or a wall.
- Red - Chance to become a wall trap, or a wall.
- Yellow - Generic floor.
- Orange - Chance to become a floor trap, or just a floor.
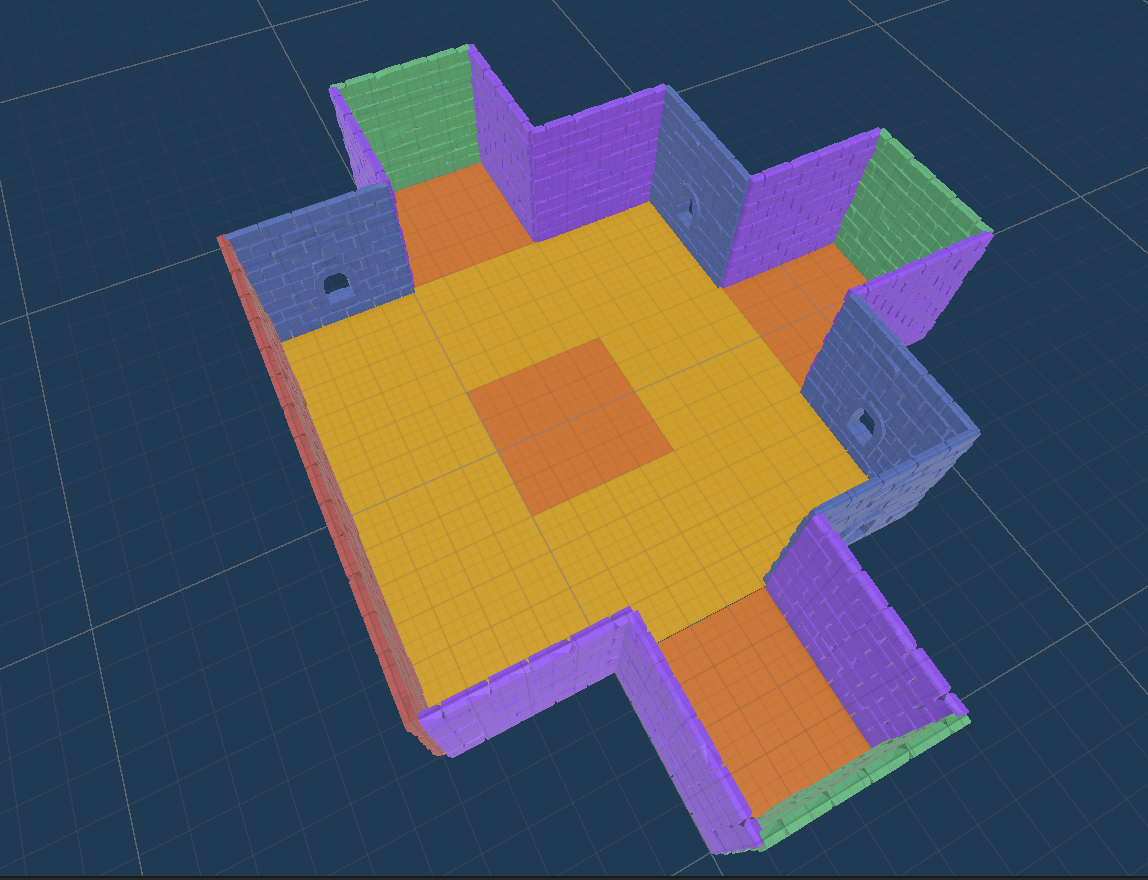
The output includes some other systems, like the objects in the scene I will go over in another post, but this is what that ugly colored room comes out to be when generated during runtime.
Each room prefab has several doors to choose from. When placing a new room, the system selects an open door on the previously placed room and aligns the next room accordingly. After connecting, doors are marked as "used," preventing overlaps or disconnected rooms. This technique effortlessly produces fluid, engaging layouts without complex algorithms.
Despite the simplicity of the idea, I hit several challenges along the way:
- How to consistently pick the "best" door to use next?
- How to determine the ideal rotation between connecting rooms?
- How to accurately calculate positional offsets to snap rooms together perfectly?
The door score system
Selecting the optimal door was trickier than anticipated. Each room had multiple doors, each positioned differently, and rooms could rotate in increments of 90°, adding complexity. My solution was to create a simple but effective "door scoring" method based on distance.
- Test rotations: Temporarily rotate the new room through all possibilities (0°, 90°, 180°, 270°).
- Measure distances: For each rotation, calculate distances from doors on the new room to the target door on the existing room.
- Select the best: Choose the door and rotation combination with the shortest distance.
While effective, the method isn't perfect yet. It doesn't account for more complex room shapes, like "U-shaped" rooms connecting awkwardly to "T-shaped" rooms. However, it's a strong foundation and more than adequate for my current needs.
Determining the best rotation between room A and room B
After choosing doors, I needed to ensure rooms aligned logically. This meant accurately rotating rooms so doors faced each other naturally.
The rotation logic is straightforward:
- If doors face opposite directions, rotate Room B by 180°.
- If doors are perpendicular, rotate Room B by ±90°, choosing the shortest rotation.
- If doors already face each other, no rotation is necessary.
| Door A Orientation | Door B Orientation | Rotation Applied |
|---|---|---|
| Opposite Directions | (e.g., North & South) | 180° |
| Perpendicular (Clockwise) | (e.g., North & East) | -90° |
| Perpendicular (Reverse) | (e.g., East & North) | 90° |
| Already Aligned | (e.g., North & North) | 0° (No rotation) |
Determining the room offset
After aligning rotations, the final step was precisely positioning rooms so they'd "snap" neatly into place without gaps or overlaps.
The offset calculation involves:
- Room Bounds: Using bounding boxes to understand the size and extents of each room.
- Door Positions: Calculating exact differences between the connected doors.
- Directional Logic: Using the door's orientation to determine exactly where the room should go.
- Up: Position next to Room A's right side.
- Right: Place in front of Room A.
- Down: Position next to Room A's left side.
- Left: Place behind Room A.
This method ensured rooms snapped together accurately, creating neat, intuitive connections and a natural flow in the dungeon. This function, also ended up being really messy.
    private static Vector3 GetRoomPositionWithCalculatedOffset(GameObject roomA, GameObject roomB, Transform roomADoor, Transform roomBDoor)
    {
        Bounds roomABounds = roomA.transform.BoundingBox();
        Bounds roomBBounds = roomB.transform.BoundingBox();

        // Get piece options to grab door direction.
        RoomFixtureMono pieceA = roomADoor.GetComponentRoomFixtureMono();

        Vector3 doorOffset = (roomADoor.transform.position - roomBDoor.transform.position);

        float baseX = roomABounds.center.x + doorOffset.x;
        float baseY = roomABounds.center.y + doorOffset.y;
        float baseZ = roomABounds.center.z + doorOffset.z;

        switch (pieceA.Direction)
        {
            // +X.
            case SpatialOrientation.Up:
                return new Vector3(roomABounds.max.x + roomBBounds.extents.x, baseY, baseZ);

            // -Z
            case SpatialOrientation.Right:
                return new Vector3(baseX, baseY, roomABounds.min.z - roomBBounds.extents.z);

            // -X
            case SpatialOrientation.Down:
                return new Vector3(roomABounds.min.x - roomBBounds.extents.x, baseY, baseZ);

            // +Z
            case SpatialOrientation.Left:
                return new Vector3(baseX, baseY, roomABounds.max.z + roomBBounds.extents.z);

            // Invalid piece type.
            default:
                throw new System.ArgumentOutOfRangeException(Provided an invalid direction when for calculating a room offset. Provided: + pieceA.Direction);
        }
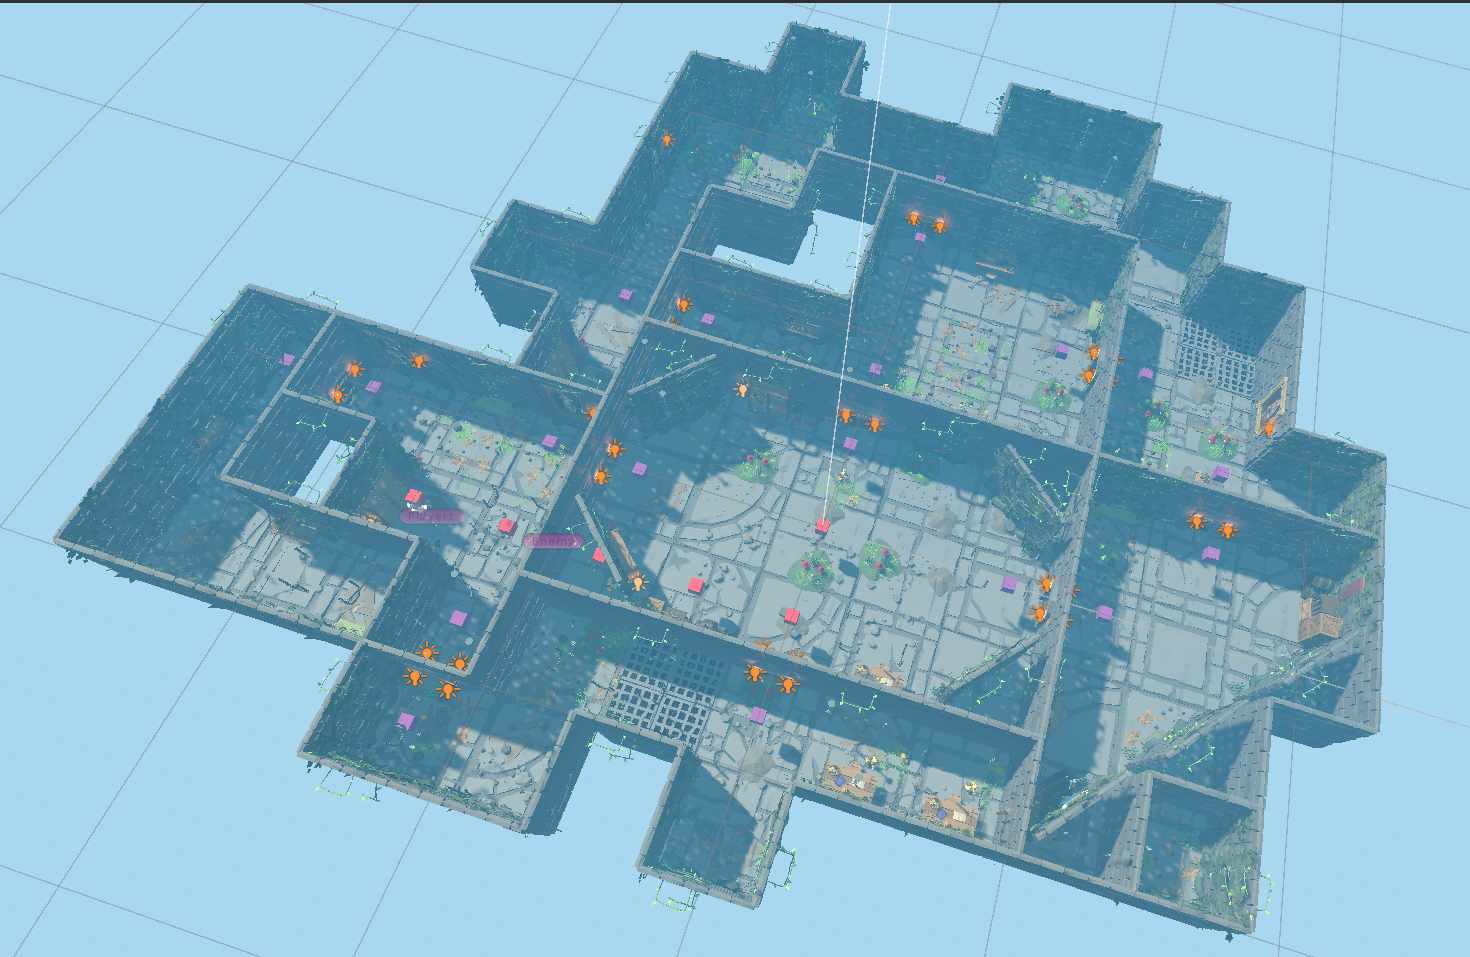
The result of using a chain, like connection system with the maze was a huge success. The output ended up providing unique ways to generate mazes. After getting rooms properly configured and made I worked on procedural hallways using leftover doors from rooms.
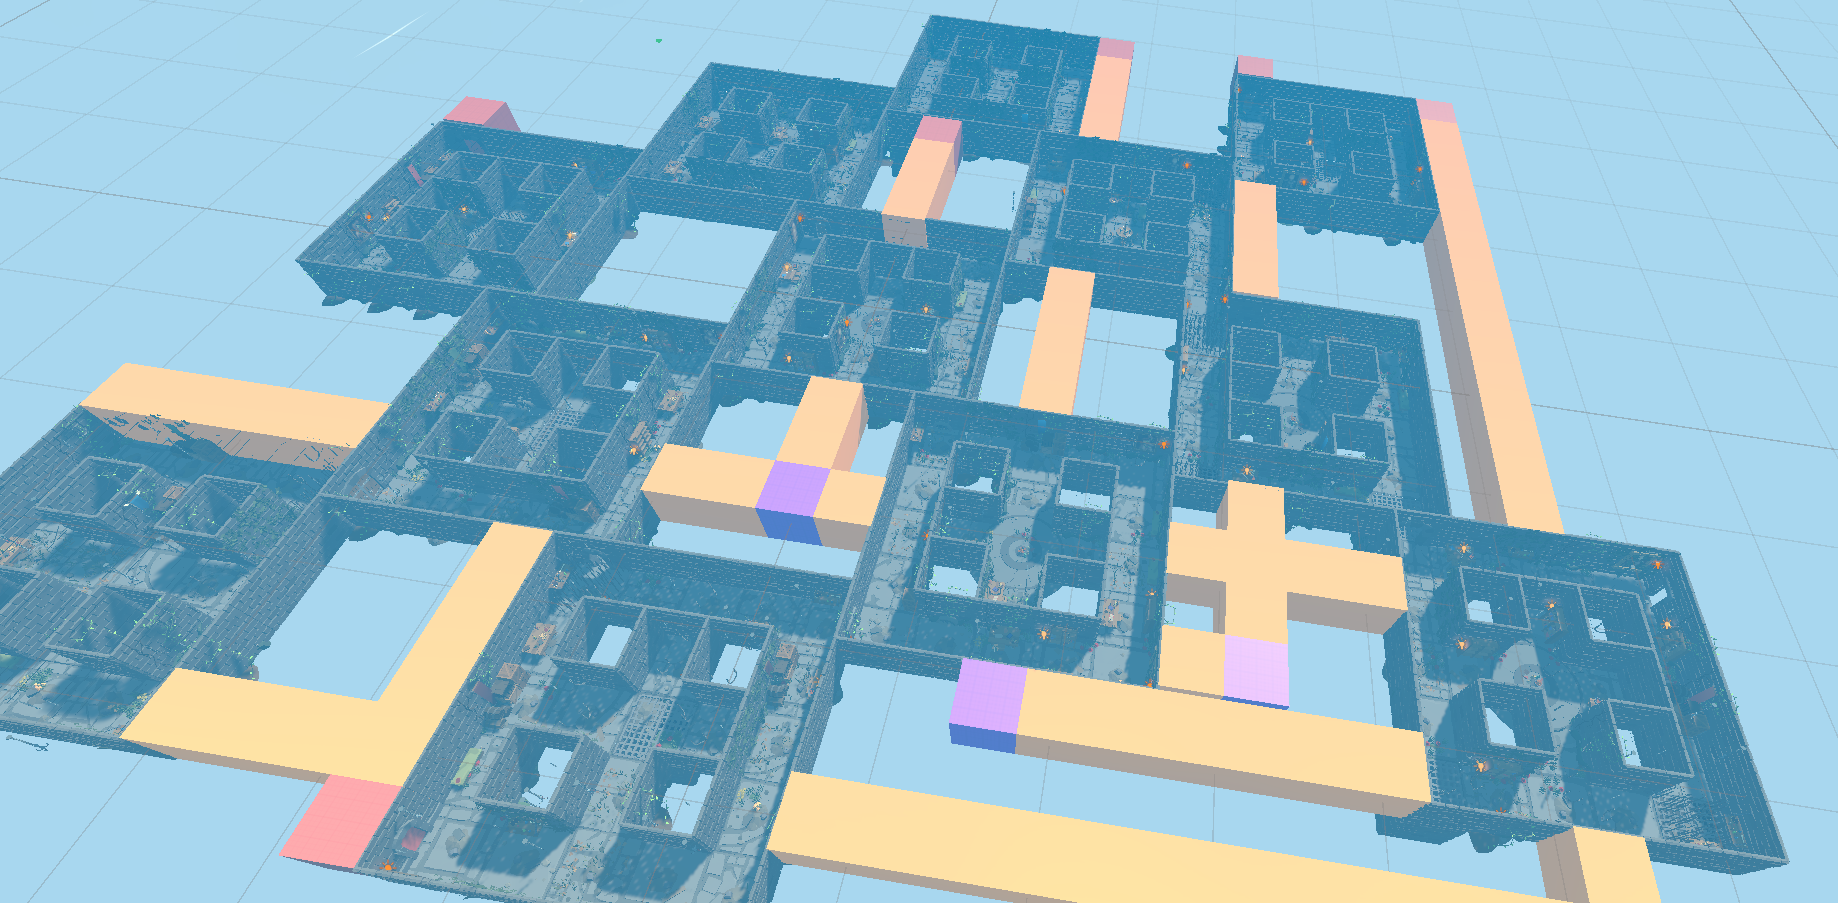
The result of using a chain-like connection system with the maze was a huge success.
I began this project with little experience in procedural dungeon generation and came away humbled by the complexity involved. What seemed like a simple idea—connecting rooms through doors—quickly became a deep dive into geometry, rotation math, bounding boxes, and even graph algorithms.
Building a system that feels random but purposeful required research, trial and error, and a lot of debugging. But in the end, the results speak for themselves: a flexible, chain-based room system that naturally extends into procedurally generated hallways using unused doors.
This post is already way too long, so in the next one, I’ll cover how I went insane implementing 3D hallways, a CPU-friendly A* pathfinding system, and a room prop system using the factory pattern to spice things up dynamically.
Until then, thanks for making it to the end!